> ## Documentation Index
> Fetch the complete documentation index at: https://nango-tiktok-accounts-update.mintlify.site/llms.txt
> Use this file to discover all available pages before exploring further.
# Build Your Own Integrations
> Extend & create your own custom syncs & actions.
# Step 1: Setup the Nango CLI & nango-integrations folder
Install the Nango CLI globally:
```bash
npm install -g nango
```
Your Nango *syncs* & *actions* live in your repo in a folder called `nango-integrations`. You can place this folder anywhere in your file tree, but we recommend you place it at the root level of your project.
In the folder where you want your integrations folder (e.g. root of your project), run:
```bash
nango init # Creates `./nango-integrations` with initial config
```
**Understanding the `nango-integrations` folder**
*Syncs* & *actions* have two parts:
* A global config file called `nango.yaml` with *sync/action* names, frequency, models, etc.
* A small typescript file per *sync/action*, which defines the logic.
They all live in a folder called `nango-integrations` in your own code repository.
```txt nango-integrations structure
|
nango-integrations
|
+- nango.yaml
+- github-issues.ts
+- slack-notification-send.ts
...
```
Our CLI helps you manage this directory, create scaffolds, validates the configuration, etc.
Next, we need to authenticate the CLI. Add the following env vars (e.g. in an `.env` file in `./nango-integrations`):
```bash
NANGO_SECRET_KEY_PROD=''
NANGO_SECRET_KEY_DEV=''
```
Get your `prod` and `dev` secret keys from the [Project Settings tab](https://app.nango.dev/project-settings) (toggle between the `prod` and `dev` environment in the left nav bar).
# Step 2: Create a *sync* or *action*
### Configure your *sync/action* in `nango.yaml`
Open the `nango.yaml` file inside the `nango-integrations` folder and inspect its field:
```yaml nango.yaml
integrations:
asana-dev: # Integration name (must match an integration name in the Integrations tab of your Nango dashboard).
asana-tasks: # Arbitrary (unique) sync name
runs: every 30min # Sync frequency, can't be <5mins, format details on https://github.com/vercel/ms
returns:
- AsanaTask # Required data model (defined below) as returned by your sync script
slack-dev:
slack-alert: # Arbitrary (unique) action name
type: action
returns: SlackAlertResponse # Optional data model (defined below) as returned by your action script
models:
AsanaTask: # Data model referenced above
id: string # Required unique ID
project_id: string
name: string
completed: boolean
created_at: date
modified_at: date
SlackAlertResponse: # Data model referenced above
ok: boolean
```
Possible model types include `string`, `boolean`, `number`, `date`, `null` as well as arrays & nested objects. Union types can be used with `|`.
Model names must be singular as they are a single entity.
A more complex example:
```yaml
ExampleUser:
id: string # Required, we recommend a string or number
project_id: string
names: string[] # An array of strings
number_of_cats: number
completed: boolean
emails:
personal_email: string
business_email: string | null
other_emails: string[] | null
created_at: date # Date is a full timestamp with both date & time
modified_at: date
```
Nango uses the models you define in `nango.yaml` to provide type safety when:
* you write *sync/action* scripts
* *sync/action* scripts run
* you fetch the synced data for *syncs*, or pass in parameters and get back a response for *actions*
*Syncs/actions* and data models can be combined at will:
* A *sync* can return multiple data models: e.g. `AsanaTasks` and `AsanaComments`
* Multiple *syncs* can return the same data model: e.g. Asana and Linear can both return a `Task`
This lets you easily **create your own unified API** with standard data models tailored to your needs.
### Write your *sync*
Modify the configuration of `nango.yaml` as you need and run (in `./nango-integrations`):
```
nango generate
```
This will generate the scaffold for your *sync* script(s). Open any *sync* script (named `[sync-name].ts`) which contains the following template (for the Asana example above):
```typescript asana-tasks.ts
import { NangoSync, AsanaTask } from './models';
export default async function fetchData(nango: NangoSync): Promise {
// Integration code goes here.
}
```
*Sync* scripts mostly do 2 things. They:
* incrementally fetch data from external APIs (with HTTP requests)
* transform the external data into the models that you defined in `nango.yaml`
This logic is defined by you so that you can build arbitrarily custom and complex integrations.
Your *sync* scripts are deployed to Nango and automatically run on a schedule. Nango offers you multiple environments (dev & prod) to test & deploy your *syncs*.
Because your scripts run in Nango's cloud, you cannot import additional modules (external or relative) in the *sync* scripts at the moment (we plan to resolve this limitation in the near future).
To develop syncs locally and test them run the following within `./nango-integrations`:
```bash
nango dev # Continuously watches integration files for changes.
```
Nango now watches your `nango-integrations` folder for changes and compiles the sync scripts & data models as needed. If there are any compilation errors (e.g. due to type issues), you can see them in the terminal where `nango dev` runs.
Fill in the `fetchData` method with your integration code (in the example here, we fetch tasks from Asana):
```ts asana-taks.ts
import { NangoSync, AsanaTask } from './models';
export default async function fetchData(nango: NangoSync): Promise {
// Get the user's workspaces & projects
// For testing we just get the first project of the first workspace
const workspaces = await paginate(nango, '/api/1.0/workspaces');
const workspace = workspaces[0];
const projects = await paginate(nango, '/api/1.0/projects', { workspace: workspace.gid });
const project = projects[0];
// Get all tasks for the project
const filters = {
project: project.gid,
opt_fields: 'name,completed,created_at,modified_at'
}
const tasks = await paginate(nango, '/api/1.0/tasks', filters);
let mappedTasks: AsanaTask[] = [];
for (let task of tasks) {
mappedTasks.push({
id: task.gid,
project_id: project.gid,
name: task.name,
completed: task.completed,
created_at: task.created_at,
modified_at: task.modified_at
});
if (mappedTasks.length > 49) {
await nango.batchSave(mappedTasks, 'AsanaTask');
mappedTasks = [];
}
}
await nango.batchSave(mappedTasks, 'AsanaTask');
}
async function paginate(nango: NangoSync, endpoint: string, queryParams?: Record) {
const MAX_PAGE = 100;
let results: any[] = [];
let page = null;
let callParams = queryParams || {};
while (true) {
if (page) {
callParams['offset'] = `${page}`;
}
const resp = await nango.get({
endpoint: endpoint,
params: {
limit: `${MAX_PAGE}`,
...callParams
}
});
results = results.concat(resp.data.data);
if (resp.data.next_page) {
page = resp.data.next_page.offset;
} else {
break;
}
}
return results;
}
```
*Sync* scripts return the created/update data to Nango with `await nango.batchSave(data, 'ModelName');`. You can split the data into as many batches as needed.
To make API requests, use the proxy exposed by the `nango` object ([Proxy guide](/guides/proxy)).
* `nango.get({})`
* `nango.post({})`
* etc
You do not need to specify the `providerConfigKey` and `connectionId` fields in the call to the Proxy. They are automatically injected.
The 1st run of the *sync* is called "initial", meaning it fetches all the historical data (unless you have defined a backfill limit in the *sync* script). On the 1st run, `nango.lastSyncDate` will be `null`.
Subsequent runs are called "incremental". They should only fetch the created & updated data. It's up to you to use the `nango.lastSyncDate` value to fetch the incremental changes.
Use `await nango.log()` to log data from within integration scripts.
### Write your *action*
Modify the configuration of `nango.yaml` as you need and run (in `./nango-integrations`):
```
nango generate
```
This will generate the scaffold for your *action* script(s). Open any *action* script (named `[action-name].ts`) which contains the following template (for the Slack example above):
```typescript slack-alert.ts
import { NangoAction, SlackAlertResponse } from './models';
export default async function runAction(nango: NangoAction, input: any): Promise {
// Integration code goes here.
}
```
*Action* scripts let you arbitrarly interact with external APIs. This logic is defined by you so that you can build arbitrarily custom and complex integrations.
Your *action* scripts are deployed to Nango and automatically run on a schedule. Nango offers you multiple environments (dev & prod) to test & deploy your *actions*.
Because your scripts run in Nango's cloud, you cannot import additional modules (external or relative) in the *action* scripts at the moment (we plan to resolve this limitation in the near future).
To develop *actions* locally and test them, run the following within `./nango-integrations`:
```bash
nango dev # Continuously watches integration files for changes.
```
Nango now watches your `nango-integrations` folder for changes and compiles the *action* scripts & data models as needed. If there are any compilation errors (e.g. due to type issues), you can see them in the terminal where `nango dev` runs.
Fill in the `runAction` method with your integration code:
```ts slack-alert.ts
import { NangoAction, SlackAlertResponse } from './models';
interface SlackAlertParams {
channel: string
}
export default async function runAction(nango: NangoAction, input: SlackAlertParams): Promise {
const res = await nango.post({
endpoint: '/chat.postMessage',
params: {
channel: input.channel,
text: "Hello world :tada"
}
});
return { ok: res.data.ok }
}
```
*Action* scripts are called programmatically from your codebase, run synchronously and return the data specified in the `runAction` function.
To make API requests, use the proxy exposed by the `nango` object ([Proxy guide](/guides/proxy)).
* `nango.get({})`
* `nango.post({})`
* etc
You do not need to specify the `providerConfigKey` and `connectionId` fields in the call to the Proxy. They are automatically injected (as well as credentials).
Use `await nango.log()` to log data from within integration scripts.
### Dry run your *sync/action*
Before you deploy your *sync* to your cloud account, you can test it locally to make sure it works as expected. You will probably use this a lot whilst developing your sync.
Use the `dryrun` function of the CLI:
```bash
nango dryrun asana-tasks # Sync
nango dryrun slack-alert test-connection-id --input '{"channel": "C02MPPQC8FK"}' # Action
```
Because this is a dry run, the fetched data will not be stored in Nango. Instead dryrun will print the data as returned.
By default, the *connection* ID is fetched from your `Dev` environment. You can fetch *connections* from your `Prod` environment with the `-e prod` flag.
To test incremental *sync* runs, add the `-l` flag (which will populate the `nango.lastSyncDate` value in your script):
```bash
nango dryrun asana-tasks -l "2023-06-20T10:00:00.000Z"
```
# Step 3: Deploy a *sync/action*
**1. Deploy to the `Dev` environment**
When your *sync* script is ready, you can deploy it to your `Dev` environment in Nango:
```bash
nango deploy dev
```
Inspect the [Syncs & Actions tab](https://app.nango.dev/syncs) to verify the deployment succeeded.
When you deploy your *sync*, Nango automatically adds it to all the existing *connections* of the *integration*, and starts syncing their data.
It will also add the *sync* to any new *connection* that is created (OAuth flow completes) for the *integration*.
You can see all *syncs* (and their status) for a *connection* in the dashboard:
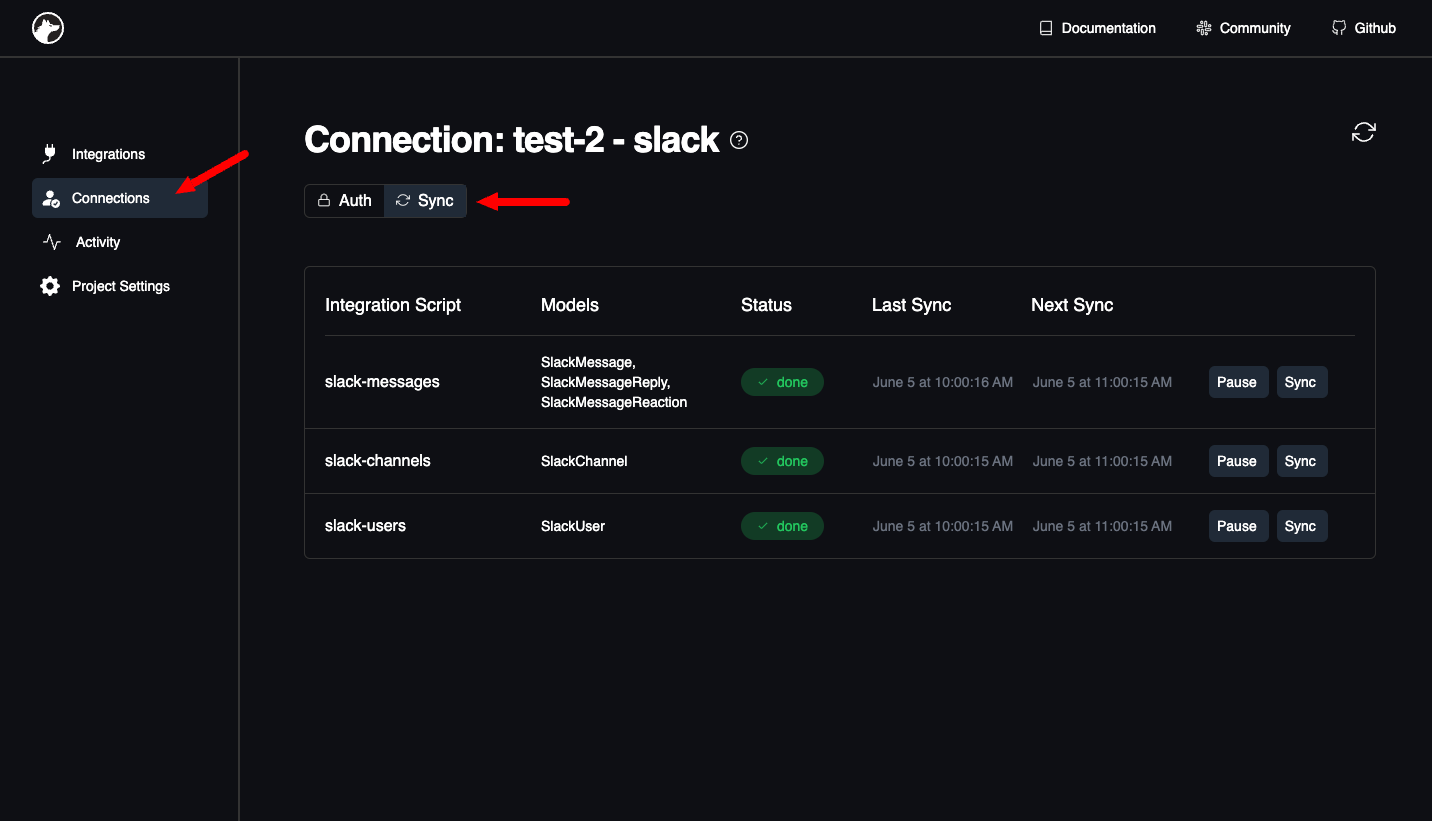
**2. Deploy to the `Prod` environment**
Once you are ready to deploy to production, run:
```bash
nango deploy prod
```
## Advanced Configuration
### Handling API rate-limits
Nango has currently two approaches to handle rate limits, a generic/naive one and an API-specific one.
The **generic & naive approach** is based on retries & exponential-backoff. When you make network requests with the *proxy* in a *sync* with a high number of retries, exponential back-off will increase the delay between retries, augmenting the chances to go back under the rate-limit. But this "blind" approach is inefficient both in terms of optimising the time between requests and avoiding complex rate-limits.
The **API-specific approach** is based on reading the rate-limit headers returned by the external APIs. Nango observes these headers and pauses the *sync* job until the rate-limit is passed. This approach has the benefit of being more efficient both for minimizing *sync* durations and avoid failures due to rate-limiting.
This second approach requires to edit Nango's [providers.yaml](https://nango.dev/providers.yaml) file to indicate the rate-limit header name for a specific API (in the `retry` entry, under `at` or `after` fields):
Github example:
```yaml
github:
auth_mode: OAUTH2
authorization_url: https://github.com/login/oauth/authorize
token_url: https://github.com/login/oauth/access_token
proxy:
base_url: https://api.github.com
retry:
at: 'x-ratelimit-reset'
docs: https://docs.github.com/en/rest
```
Discord example:
```yaml
discord:
auth_mode: OAUTH2
authorization_url: https://discord.com/api/oauth2/authorize
token_url: https://discord.com/api/oauth2/token
authorization_params:
response_type: code
proxy:
retry:
after: 'Retry-After'
```
### Handling record deletion
In Nango, *syncs* can detect record deletions. These deleted records are not removed, but are flagged as "soft deleted" using metadata. This ensures that you can still view the records in Nango, but recognize them as deleted entities.
Each record has a `_nango_metadata` field that carries metadata, including deletion information:
```yaml
_nango_metadata: {
deleted_at: null,
last_action: 'ADDED',
first_seen_at: '2023-09-18T15:20:35.941305+00:00',
last_modified_at: '2023-09-18T15:20:35.941305+00:00'
},
```
Deletion handling differs depending on the mode of the *sync* – whether it's incremental (fetches only changes since the last *sync* run) or full refresh (fetches all data every time).
**Incremental *syncs***
In incremental *syncs*, utilize the `batchDelete` method in your script to flag records as deleted:
```ts
await nango.batchDelete(users, 'User');
```
Note: The deleted entities (in this case, `users`) need to provide just the unique `id` field.
**Full refresh *syncs***
For *syncs* that operate in full refresh mode, add the `track_deletes: true` field to your `nango.yaml` configuration for the particular *sync*. This ensures that when a record previously returned by the sync script isn't returned in the latest run, Nango will flag it as deleted.